
Load-Balancing the SCOM Web Console - Part 2
It´s time for the second post about load-balancing the SCOM Web Console that I started publishing last week in this two-post series. In the first post I showed how to setup the foundation which in this case consists of a two-node cluster, which I created using Network Load Balancing which is a feature of Windows Server. If you haven´t already read the first post, read it here before diving into this post.
What I will show in this post is how to configure the SCOM web console to allow for us to have Single Sign-On working. Configuring the Web Console itself
Find the Web.config file in the installation path on your SCOM web console servers. In my case it was “D:\Program Files\Microsoft System Center 2016\Operations Manager\WebConsole\WebHost”
I opened it up with Notepad and edited these values;
- autoSignOutInterval from the default 30 to 0 to make sure it doesn’t sign me out from time to time
- managementServer name from localhost to “SCOM.Orneling.Intra” (this is the cluster name we created in the earlier post)
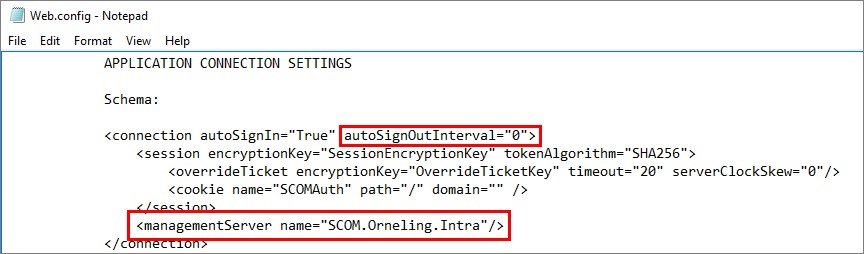
Repeat this process on all the SCOM web console servers and make sure they all look the same.
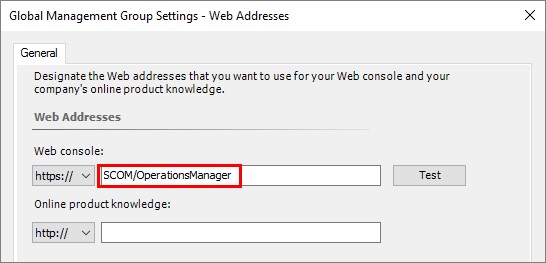
After the web.config file have been edited, we need to make one tiny change in the Operations Console. To make sure that when an alert is triggered and sent out via a SMTP channel for example, the correct web console address need to be attached to the e-mail.
In the Operations Console, navigate to Administration -> Settings -> Web Addresses and change the web address to something like seen below:
At first sight, one might think that this should be it and that we should be ready. That´s only partially true, we will be able to access the web console but there won´t be any Single Sign-On (which at least I find very nice). To solve this, we need to work some magic with Service Principle Names (SPN´s) and an account to run the console.
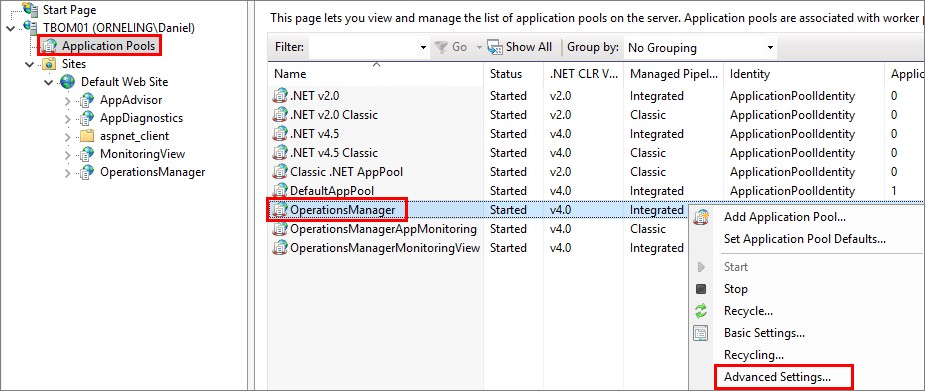
The first thing we should do is to change the account that runs the web console application pool. This is done through the IIS Management Console on the servers.
Navigate to the OperationsManager application pool like below, and click Advanced Settings.
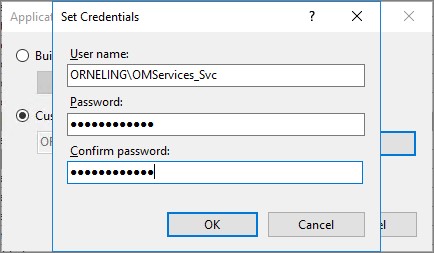
Scroll down to “Identity”, click the “three dots button” followed by “Set…”. Enter the account to run the application pool. I have used the DAS account of my environment.
Click OK twice and you´re ready with this part.
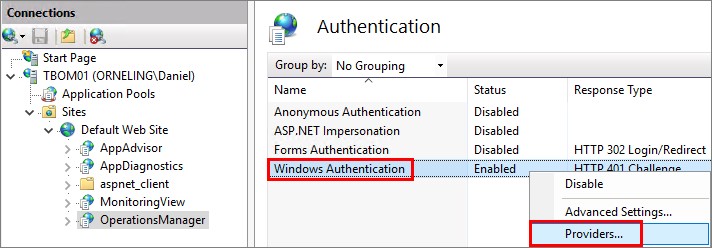
The next thing we need to do is to configure the authentication procedure for the two web sites “OperationsManager” and ”MonitoringView”. Click one of them and then double-click “Authentication”.

Make sure only “Windows Authentication” is enabled, right click it and choose “Providers”.
Now make sure your list shows NTLM, Negotiate:Kerberos, Negotiate in this order.
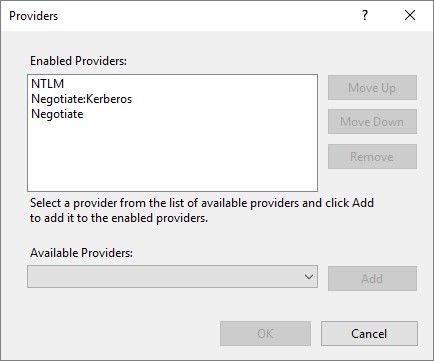
Repeat this process for the “MonitoringView” web site and then repeat both the application pool identity and the web site authentication changes on all your web console servers.
This is important to configure for all your SCOM web console servers, otherwise your Single Sign-On won´t work.
Setting up the SPN´s
So the last step in order for us to get Single Sign-On working is to configure the SPN´s. Since this process includes us browsing to a cluster address (SCOM/OperationsManager), we need to make sure that the “jump” from the cluster and to the web server node works out and that the identity is maintained through the process.
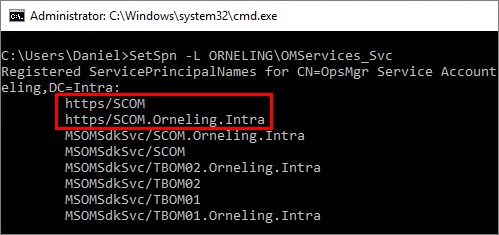
In my environment, I am using HTTPS for my web console, so I have registered two SPN´s using the below commands.
- SetSpn -a https/SCOM ORNELING\OMServices_Svc
- SetSpn -a https/SCOM.Orneling.Intra ORNELING\OMServices_Svc
Note: If you´re running HTTP instead of HTTPS, just change https to http in the above commands.
Once the SPN´s are registered, you can look it up by running the command SetSpn -L DOMAIN\Account, like below.
And that should be it, we should now have a fully functional, fault tolerant and load-balanced web console with working Single Sign-On.
Testing it out
I have tried this out on both my servers and a windows 10 client to make sure that it works everywhere, and for the first line technicians that usually don´t log on to the servers themselves.
A little foot note is that I have had problems with this when trying the web console from my servers, but that was solved once I deactivated IE Enhanced Security Configuration in the Server Manager on the servers.
See below what it looks like when accessing the SCOM web console. Click the picture to open it and see exactly what it looks like.
(No, my web console isn’t really this lightning fast. I just deleted some of the frames while the console loaded to make it a shorter GIF 😊.)
Note: Sadly, It is not supported by Microsoft to use a Network Load Balancer for the web console. This means if you run into any problems with this setup or other problems with the web console, Microsoft won´t be able to help you out. In other words, try it out in your test environment before considering doing this in your production environment. And as always, my solutions come with no warranties.
Summary
That´s it, we have a load-balanced and fault-tolerant SCOM web console! It took some time to get the Single Sign-On process to work properly but once the SPN´s and the authentication parts were taken care or, everything worked like a charm. Now, instead of having to change the web addresses in the Operations Console if a server crashes we can just use the cluster address knowing that the load balancer will lead us right.
Once the new release of SCOM 1801 is out and available, I will dive into the new web console as well to see what we can do with that instead of this current SCOM web console.
Hopefully this is something you might find useful, I know at least I do. Leave a comment below if you have any questions and I´ll get back as soon as possible.
Comments