Getting started with Azure ARM templates
The first time I heard about JSON and ARM templates together with Azure in the same sentence, was in Chicago at Microsoft Ignite back in 2015. My first thought was, what are they all talking about? This was of course during the shift from Azure “classic” which was based on XML, to Azure “Resource Manager” which is based on JSON instead.
As I mentioned, this was back in 2015 so nearly five years ago now, but even more important nowadays. My first experience with this new way of working with Azure was a bit of a rollercoaster, every time I grasped something, another thing showed up that made absolutely no sense at the time. Back then I looked at a lot of sample templates and practiced my copy/paste skills to build a template that was deploying the resources I wanted to deploy.
The foundation
Now it´s 2020 and a lot has happened in many ways, and thankfully it´s a lot easier to get started writing ARM templates with a bunch of different tools, of which of I´m going to show a few in this post. If you don´t know what an ARM template is, it´s basically a JSON file which define the objects you want to deploy, their names, types and properties. This file is then read by the Azure Resource Manager API and deployed in the exact same way each time you run it. If something already exists, it checks for changes and if there are no changes it just skips that part of the template.
The base template
The base template looks like below and consists of several different sections.
- Parameters: Can be set to a default value, with a drop-down list of allowed values (which regions you can deploy to for example) and can be changed upon deployment.
- Variables: Used in the resources section of the template. Can be a combination of several parameters, or just hard-coded values. Used to define naming standards just to mention one use case.
- Resources: The resources to be deployed along with it´s name, properties and tags etc.
- Outputs: Used to return values from the template, the endpoints of a storage account for example

The base template.
Getting started writing code
Over the years I have come to a good understanding of ARM templates and how to write them to do the things I want them too, but it hasn´t been easy. To help you get started, I want to recommend those tools I use in my work with ARM templates to make things and life in general a lot easier. And it also saves a lot of time. With these tools I´m about to recommend I can build a new ARM template to deploy a new automation account or a Log Analytics workspace in about five minutes, and that´s with some tweaking of the naming etc.
The first tool I recommend using as the foundation is Visual Studio Code, which is an awesome tool to write code. I use it to write PowerShell, JSON and also YAML (for my home automation). If you haven´t tried it yet, download it here to get started. A pro tip is to create a new file and just saving it as “new-file.json” or .ps1 for example, just keep the “” when you save it. VS Code will then recognize it´s either a JSON file or a PowerShell script, and highlight the script in a correct and easy-to-work-with way.
Visual Studio Code Extensions
Azure Resource Manager (ARM) Tools
This is the first extension to install when looking at writing ARM templates using VS Code. With this extension, VS Code understands Azure Resource Manager deployment template files. It also helps pointing out sections where the JSON code is faulty.
With this extension you get some snippets to start building your templates. Just type arm! in a json file and you will get to choose from the below snippets.
- arm! - Adds the framework for a full deployment template file for resource group deployments
- arm!s - Adds the framework for a full deployment template file for subscription deployments
- arm!mg - Adds the framework for a full deployment template file for management group deployments
- arm!t - Adds the framework for a full deployment template file for tenant deployments
- armp! - Adds the framework for a full deployment template parameters file
Download the extension from Visual Studio Marketplace here, or from within VS Code directly (see below), from the Extensions section. At the extension page, you can also see all the snippets available.

The extensions pane of VS Code
Azure Resource Manager Snippets
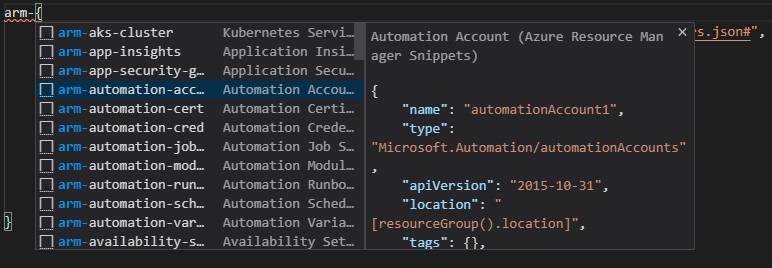
When I said I can write a new template in five minutes, I am relying on an extension written by MVP Sam Cogan. It´s by far the extension I have had the most use of so far. It consists of a bunch of snippets which lets you deploy the resources you want. All you have to do is to launch a new json file and start typing “arm-“ and the snippets will show up and you can choose whichever you would like to use. Start with a Skeleton ARM Template (provided by the first extension above) and you will get the content shown above, ready to be filled up with different parameters and resources etc. It can also help you write the parameters necessary. Find a complete sample template further down in the article.
Download the extension here or through VS Code Extensions as shown above.

Some of the available snippets
ARM Params Generator
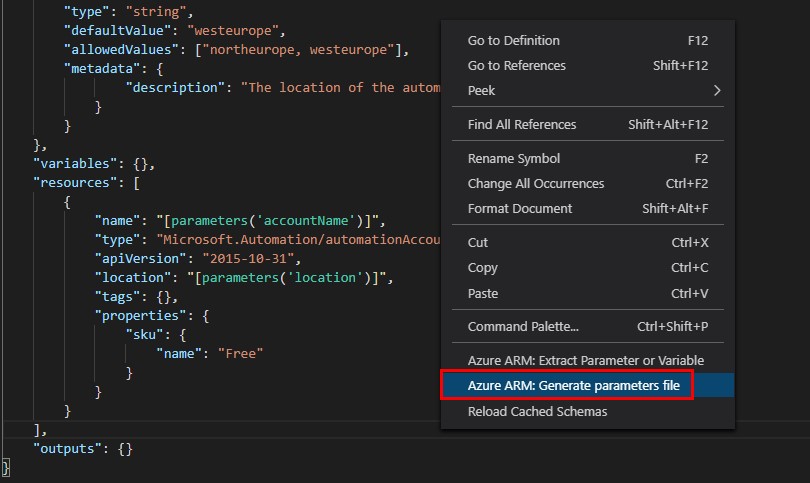
The next extension on my list is one that helps generating a parameters file. This file is used to point out the custom values that are to be changed upon deployment and consists of only a parameters section with the different values. Once you have created your ARM template and have installed this extension, just right click somewhere in the code section and choose “Azure ARM: Generate parameters file”, and it will create a file named “templatename.parameters.json”. See below what it looks like.

Generate a parameters file for your ARM template

The parameters file. Find the source code further down.
Download the extension here or through VS Code Extensions as shown above.
JSONLint
The last tip for the day is a web site helping you validate your JSON code. It points you to where you need to check your code, which have saved me numerous times since it´s really easy to miss an indentation or a parenthesis or whatever when writing code. Find the JSON validator here and remember to bookmark it, cause you will need it.
Sample code
I have placed a complete sample of the ARM template I used for this blog, along with a parameters file and a PowerShell script to deploy it over at Github.
Find it in my public repository here.
Microsoft Tutorial: Create and deploy your first ARM template
If you´d like to, you could also check this tutorial out that Microsoft has created on how to create and deploy your first ARM template. It will guide you from the start to the finish line where you have deployed your first template. Find the tutorial here.
Summary
As I´ve shown here, it doesn’t have to be that big of deal to get going with ARM templates and JSON. There are tools out there to help, so use them just as everyone else. The extensions itself won´t help you understand the JSON language, but along the way you will get a grasp of it and hopefully you will have that aha feeling, just like I did when I was learning JSON.
I will go through the area of ARM templates even more and tell more about what can be done, such as skipping hard-coded names etc. in upcoming posts. If you like the post or have questions, please leave a comment below and I´ll get back as soon as possible.

Comments