
Getting started - Nano Server
When Windows Server 2016 is launched later this year, we will be able to choose from three versions to deploy, the full version including the complete user interface, the core edition which we´ve seen before and the new Nano edition which we haven´t seen before. Nano server? What´s that?
Nano server is the version that´s been on an extreme diet which you will manage remotely and also install remotely. A few advantages that Microsoft has mentioned in marketing Nano server is:
- 93 percent lower VHD size
- 92 percent fewer critical bulletins
- 80 percent fewer reboots
Getting started with Nano server isn´t as easy as we´re used to, just mounting the media and installing it onto our virtual machine so that´s why I´ve written this guide on getting started with Nano Server. You can read more about Nano server here.
Creating the Nano server VHDX file Copy “NanoServerImageGenerator.psm1” and “Convert-WindowsImage.ps1” from the \NanoServer folder in the Windows Server Technical Preview ISO to a folder on your hard drive. In this case I´m using E:\Media\NanoIIS as the path. The next thing is to define what we want our Nano server image to be like and what the server should be named. If your planning to run your Nano server on a physical machine, you should add this line into the script as well: “-OEMDrivers”. This will include storage and network drivers in the image. The script below will create a VHDX file that you can use for a Hyper-V VM as an IIS web server. The last line will also add the “Microsoft-OneCore-ReverseForwarders-Package” package, which is a requirement if you want to install the SCOM Nano agent (find out more in a coming blog post).
Set-Location -Path E:\Media\NanoIIS Import-Module .\NanoServerImageGenerator.psm1
$password = “YourPassword” $securepass = ConvertTo-SecureString -AsPlainText $password -Force
Create the VHDX file with the below parameters - Change MediaPath to the path where you´ve extracted the Server 2016 TP4 media. - Also change the TargetPath and ComputerName to reflect the name of your new server.
New-NanoServerImage -MediaPath E:\Media\Server2016TP4 ` -BasePath .\Base ` -TargetPath E:\Media\NanoIIS\TBNANOIIS04.vhdx ` -ComputerName TBNANOIIS04 ` -AdministratorPassword $securepass ` -Packages ‘Microsoft-NanoServer-IIS-Package’ ` -Language en-us ` -EnableRemoteManagementPort ` -GuestDrivers
Add Microsoft-OneCore-ReverseForwarders-Package package to the image -This package is required to be able to install the SCOM nano agent later on.
Edit-NanoServerImage -BasePath .\Base -TargetPath ‘E:\Media\NanoIIS\TBNANOIIS04.vhdx’ -Language en-us -Packages Microsoft-OneCore-ReverseForwarders-Package
Once I´ve executed the script and it has run completely, I got the below output (the adding of the Microsoft-OneCore-ReverseForwarders-Package is not included in this picture).
 Looking at the untouched VHDX file, we will see that there is really not a large size of the file. Only 612 MB for this VHDX file, quite impressive huh?
 Create a virtual machine and point out the VHDX file you just created. You can now log on to the Nano Server Recovery Console using the password you entered in the creation process.
 In here, all you can do is to set the IP address and manage the firewall rules. If you´ve run the script above, you will only need to set the IP address to be able to remotely manage it via PowerShell.

Joining a domain When it comes to joining a domain, you will need to do an offline domain-join by creating a provisioning package from a domain joined server. In this case, I´ve done it with help from my SCOM server. The script found below will create the package, connect to the Nano server, open the firewall for file and printer sharing, copy the provisioning package to the Nano server, set the DNS address, join the domain and reboot the server. Just change the server names in the script and the DNS IP address(es) along with the domain name before running the script.
# On a domain joined server, run the below command with your domain name and change the server name as well. Set-Location C:\Windows\System32 djoin.exe /provision /domain “Orneling” /machine “TBNANOIIS04” /savefile .\odjblob
Connect to the remote server
$computer = “NanoServerIPAddress” $cred = Get-Credential (Credential “TBNANOIIS04\Administrator”)
Enter-PSSession -ComputerName $computer -Credential $cred
Open the firewall on the Nano server to be able to access it and copy the “odjblob” file from C:\Windows\System32 to the Nano server (C:\Temp in this example)
netsh advfirewall firewall set rule group=”File and Printer Sharing” new enable=yes
Copy the provisioning package from the local server onto the Nano server.
Copy-Item “C:\Windows\System32\odjblob” \\TBNANOIIS04\C$\Temp -Recurse
Make sure the DNS address is correct, otherwise change it like below.
Set-DnsClientServerAddress -ServerAddresses “DNSIP1, DNSIP2”
Join the server to the domain
djoin /requestodj /loadfile C:\Temp\odjblob /windowspath c:\windows /localos
Shutdown /r /t 10 # Set a time in seconds that suits you Exit-PSSession
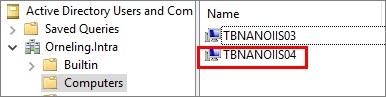
Your server should now be domain joined as my server has been below:
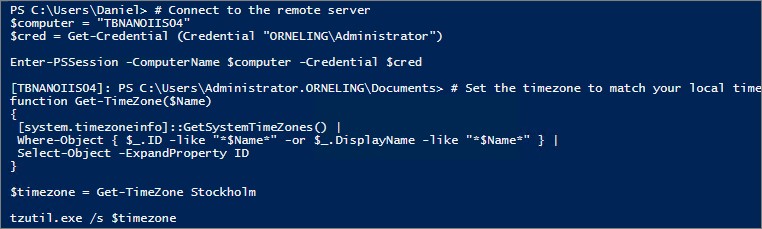
Change the time zone You can now log on to the recovery console using domain credentials, but the clock will still go wrong (in most cases). To change this, change the capital to your capital below. In this case I´ve chosen Stockholm to set the correct time zone for my server. Also change the domain and server name to be able to execute the script properly.
# Connect to the remote server $computer = “TBNANOIIS04” $cred = Get-Credential (Credential “ORNELING\Administrator”)
Enter-PSSession -ComputerName $computer -Credential $cred
Set the timezone to match your local time
function Get-TimeZone($Name) { [system.timezoneinfo]::GetSystemTimeZones() | Where-Object { $_.ID -like “*$Name*” -or $_.DisplayName -like “*$Name*” } | Select-Object -ExpandProperty ID }
$timezone = Get-TimeZone Stockholm # Type in “your” capital and grab the time zone for that city.
tzutil.exe /s $timezone
Reboot the server for the changes to take effect
Shutdown /r /t 10 # Set a time in seconds that suits you Exit-PSSession
See the output below.
 Reboot the server, remotely connnect to the server again and run Get-Date. You should now see that the time looks a lot better.
Configuring the Nano server with a demo web site In this case, I have set up a really (I mean really) simple web page and configured it to use HTTPS. Prior to running the script below, I have generated a certificate which I´m then using to change the binding for my default web site. The certificate have then been exported into the E:\Temp folder on my SCOM server along with the private key. Just change the server name, your cert password, the domain and paste your thumbprint, and you´ll be good to go. In this case I´ve created a demo web site which I´ve placed in the C:\Media\IISContent folder.
# Copy the certificate to C:\Temp on the Nano server. Copy-Item “E:\Temp\TBNANOIIS04.pfx” \\TBNANOIIS04\C$\Temp -Recurse
Connect to the remote server
$computer = “TBNANOIIS04” $cred = Get-Credential (Credential “ORNELING\Administrator”)
Enter-PSSession -ComputerName $computer -Credential $cred
Import Cert
certoc.exe -ImportPFX -p CertPasswordHere My c:\temp\tbnanoiis04.pfx
Get the certificate thumbprint - Use your actual thumbprint instead of this example
Get-ChildItem Cert:\LocalMachine\My | Select Subject,Thumbprint
Change the thumbprint to the one you got above
$certificate = Get-Item Cert:\LocalMachine\my\PasteYourThumbPrintHere $hash = $certificate.GetCertHash()
Configure site
Import-Module IISAdministration $sm = Get-IISServerManager $sm.Sites[“Default Web Site”].Bindings.Add(“*:443:”, $hash, “My”, “0”) # My is the certificate store name $sm.CommitChanges()
Exit-PSSession
Copy the template site to the Nano server
Copy-Item “E:\Media\IISContent\*” \\tbnanoiis04\c$\inetpub\wwwroot -Recurse
So what does it look like? Once I had run the above script I could navigate to my Nano server in a browser and check out my “fabulous” web page. Check below and note the https part and that it is actually running on my Nano server.

Summary What you´ve seen here is how to get started with creating the initial image, booting it up, joining a domain and also creating a simple web page with the https binding. Looking at the size and the resources needed to run Nano server, I think this will be great for a lot of companies. You can just as well run your Nano server as a Hyper-V host instead. With the decreased need for reboots, we will be able to run much longer without interruptions.
Now, this is only the first part of a blog series of (at least) 2 posts. In the coming post I will cover how you can monitor your Nano server using System Center 2016 Operations Manager (TP4). Stay tuned for that post and in the meantime, if you have any questions just leave a comment and I´ll get back to you.
Comments